When the lights go out, a portable generator can be a literal lifesaver, but simply running extension cords through windows is inconvenient, unsafe, and just plain ineffective for powering your entire home. The truly smart, safe, and efficient way to integrate a portable generator into your home's electrical system involves the DIY installation of a portable generator inlet box and manual transfer switch. This setup allows you to power essential circuits directly from your main electrical panel, bypassing the spaghetti of cords and the serious risk of backfeeding electricity into the utility grid – a hazard that can injure or even kill utility workers.
This isn't a project for the faint of heart, nor one to be undertaken without a healthy respect for electricity. While we'll guide you through the process, our primary recommendation remains: consult or hire a licensed electrician. Electricity is unforgiving, and shortcuts can have dire consequences. However, understanding the process empowers you to make informed decisions, oversee professional work, or tackle parts of it if you possess the requisite skills and local code permits.
At a Glance: Powering Your Home Safely
- What it does: A manual transfer switch safely connects your portable generator to your home's electrical panel, allowing you to power selected circuits.
- Why it's crucial: Prevents dangerous backfeeding into the utility grid and eliminates hazardous extension cords.
- Key components: A weatherproof power inlet box (on the exterior) and a manual transfer switch (inside, near your main panel).
- Selection: Match the transfer switch to your essential circuits (6-10 often ideal) and generator wattage. 240V appliances need two slots.
- Safety first: Always operate generators outdoors, far from openings, and install carbon monoxide detectors. Professional installation is highly recommended.
- Operation: Start generator, connect to inlet box, flip transfer switch to "Generator" for desired circuits.
Why Bother? Beyond Extension Cords and Dangerous Shortcuts
Imagine a winter storm knocks out power for days. Your fridge is warming, your well pump is silent, and the furnace won't kick on. Without a proper setup, your options are limited: run a few items with long extension cords, or worse, attempt to backfeed power through a dryer outlet – a move that is illegal, extremely dangerous, and can lead to electrocution for utility workers trying to restore power.
A manual transfer switch, paired with a generator inlet box, solves these problems elegantly and safely. It creates a dedicated, code-compliant pathway for generator power to flow into your home's electrical panel, but only to specific, pre-selected circuits. This means:
- Safety paramount: No backfeeding. The switch physically isolates your home from the utility grid when running on generator power.
- Centralized control: Power multiple essential circuits – lights, refrigerator, furnace, well pump – from one connection point, without a tangle of cords.
- Permanent solution: A clean, organized, and reliable setup that's ready whenever an outage strikes.
- Hardwired appliance support: Safely power crucial 240-volt appliances like well pumps or certain heating systems that extension cords simply can't handle.
Think of it as adding a "generator lane" to your home's electrical highway, complete with its own dedicated on/off ramps, ensuring no accidental collisions with the main utility traffic.
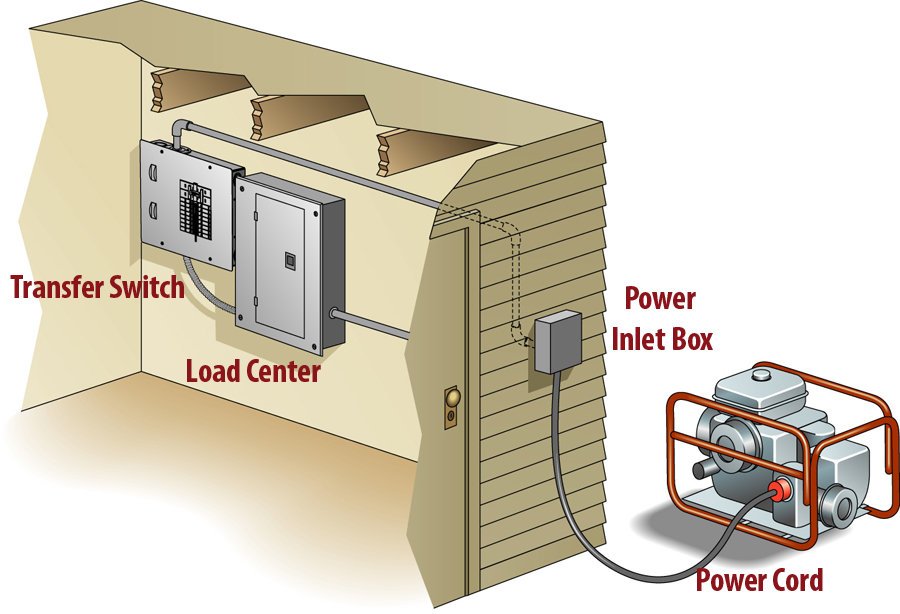
Understanding the Essentials: Inlet Box & Manual Transfer Switch
Before diving into installation, let's clarify the stars of our show:
- The Power Inlet Box: This weatherproof box lives on the exterior of your home. It's essentially a heavy-duty, outdoor-rated receptacle where you plug in your portable generator's power cord. It acts as the direct link from your generator to the transfer switch inside. Choosing a model that matches your generator's plug type (e.g., L14-30R for 30A, L14-50R for 50A) and wattage is crucial.
- The Manual Transfer Switch: Mounted next to your main electrical panel, this device is the brain of your backup power system. It contains a series of toggle switches or a large lever that allows you to manually select whether specific circuits in your home draw power from the utility grid ("LINE") or from your generator ("GEN"). Crucially, it's designed with an interlocking mechanism that prevents you from simultaneously connecting both utility and generator power, eliminating the risk of backfeeding. Generac's HomeLink™ models are a popular and reliable example.
Together, these components create a safe, seamless, and code-compliant method for powering your home with a portable generator.
Choosing Your Lifeline: Selecting the Right Components
The success and safety of your generator setup begin with selecting the correct inlet box and manual transfer switch. This isn't a one-size-fits-all situation; it depends on your specific needs and generator capabilities.
Sizing Your Manual Transfer Switch
Consider what you absolutely need to power during an outage. Are you aiming for basic necessities or a more robust setup?
- Number of Circuits: Manual transfer switches come in various capacities, typically ranging from 6 to 10 circuits. For most homes, powering essential circuits like a refrigerator, a few lights, a well pump, and a furnace fan usually falls within this range.
- Voltage Needs: Remember that 240-volt appliances (like a well pump, electric water heater, or central AC fan) require two dedicated slots on your transfer switch, as they draw power from two separate 120-volt phases. If you plan to power 240V items, ensure your transfer switch has enough "double-pole" capacity.
- Compatibility: Ensure the transfer switch's amperage rating (e.g., 30A or 50A) matches your generator's output and the inlet box you plan to install. You wouldn't want a 50-amp generator trying to push power through a 30-amp switch or inlet.
Matching Your Generator
Your portable generator's wattage and outlet configuration are paramount.
- Generator Wattage: Make sure your generator produces enough power (starting and running watts) to handle the combined load of the circuits you've selected on your transfer switch. Overloading your generator is inefficient and can damage it. If you're still exploring options, learning how to choose the right portable generator will be invaluable here.
- Generator Outlet Type: Most portable generators use a specific type of twist-lock receptacle for their high-output connection, often an L14-30R (for 30 amps) or L14-50R (for 50 amps). Your power inlet box and generator cord must match this outlet type.
Quick Tip: Before purchasing, make a list of all the essential appliances you want to power. Check their wattage requirements (usually on a label) and tally them up. This will help you choose a generator and transfer switch that can handle the load.
Safety First, Always: Non-Negotiable Precautions
Let's be unequivocally clear: working with electricity is dangerous. This project involves connecting to your home's main electrical panel, where lethal voltages are present. While this guide aims to be comprehensive, we strongly recommend hiring a licensed electrician for the installation. Their expertise ensures compliance with local electrical codes, proper wiring, and—most importantly—your safety and the safety of your family and utility workers.
If you choose to proceed with DIY, or even to understand the work a professional performs, these safety considerations are absolutely non-negotiable:
- Professional Installation: Seriously, if you're not an experienced electrician, hire one. This project involves high voltage, intricate wiring, and adherence to specific codes. Mistakes can be fatal or cause catastrophic damage to your home.
- Turn Off Main Power: Before any work begins inside your main electrical panel or connecting to it, you MUST turn off the main breaker to your entire house. Verify power is off using a non-contact voltage tester on multiple circuits. Never assume the power is off.
- Carbon Monoxide (CO) Awareness: Generators produce carbon monoxide, an odorless, colorless, and deadly gas.
- Always operate generators outdoors.
- Keep generators at least 5 feet away from all windows, doors, vents, and any combustible structures (like walls or sheds). This prevents CO fumes from entering your home.
- Install carbon monoxide detectors inside your home, especially near sleeping areas, and test them regularly. This is a critical safety measure when using a generator. For more in-depth information on preventing this silent killer, read up on generator safety and carbon monoxide prevention.
- Never Backfeed: The transfer switch is specifically designed to prevent backfeeding. Never attempt to power your home by plugging your generator into a wall outlet, even a 240V one. This bypasses all safety mechanisms and puts lives at risk.
- Proper Grounding: Your generator must be properly grounded according to the manufacturer's instructions. This usually involves connecting it to an approved grounding rod.
- Wear Appropriate PPE: When working with electrical components, always wear insulated gloves, safety glasses, and non-conductive footwear.
- Know Your Local Codes: Electrical codes vary by municipality. Always check with your local authority for specific requirements and necessary permits before starting any electrical work. This ensures your installation is legal and safe.
The Installation Journey: A Step-by-Step Overview
This section outlines the typical steps involved in installing a generator inlet box and manual transfer switch. Remember, this is an overview, and a licensed electrician's expertise is invaluable for precise execution and code compliance. Understanding understanding your home's electrical panel is a foundational step before considering this work.
Step 1: Pre-Installation Checklist & Planning
- Permits: Check with your local building department for required electrical permits.
- Location:
- Transfer Switch: Mount it directly adjacent to your main electrical panel. This minimizes the length of conduit or cable runs and makes future access easier.
- Power Inlet Box: Choose an exterior location that is close enough to the transfer switch for a direct wire run, accessible for the generator cord, and adheres to the 5-foot rule for generator exhaust. Avoid placing it directly under windows or vents.
- Tools & Materials: You'll need standard electrician's tools (wire strippers, screwdrivers, multimeter, non-contact voltage tester), appropriate armored cable or conduit (e.g., #10/4 AWG for 30A, #6/4 AWG for 50A), various connectors, and mounting hardware.
- Identify Circuits: Decide which specific circuits you want to power during an outage. Clearly label them on your main panel diagram.
Step 2: Mounting the Transfer Switch
- Locate: Position the transfer switch enclosure on the wall directly next to your main electrical panel. Ensure there's adequate clearance for the panel door and future access.
- Mark & Drill: Mark the mounting holes, drill pilot holes, and securely fasten the transfer switch to wall studs or use appropriate anchors.
- Prepare for Cable: Knock out the appropriate conduit entry points on the transfer switch and your main panel.
Step 3: Connecting to the Main Panel (Professional Zone!)
This is the most critical and dangerous part of the installation. If you are not a licensed electrician, STOP and call one now.
- Kill Main Power: Turn off the main breaker to your entire house. Confirm with a non-contact voltage tester that the main bus bars in your panel are completely de-energized. Lock out/tag out the main breaker if possible.
- Remove Panel Cover: Carefully remove the cover from your main electrical panel.
- Install Armored Cable/Conduit: Run an appropriately sized armored cable (e.g., AC or MC cable) or conduit with individual wires from the transfer switch to the main electrical panel.
- Ground Wire (Green/Bare Copper): Connect to the ground bus bar in both the transfer switch and the main panel.
- Neutral Wire (White): Connect to the neutral bus bar in both the transfer switch and the main panel.
- Hot Wires (Black/Red): These are the wires that will carry generator power. Route them to the appropriate terminals within the transfer switch.
- Rewire Selected Circuits: This is where the magic happens. For each circuit you selected:
- Locate the breaker for that circuit in your main panel.
- Disconnect the hot wire currently attached to that breaker.
- Connect this hot wire to the designated "LOAD" terminal on the transfer switch for that circuit.
- Run a new wire from the "LINE" terminal on the transfer switch for that circuit, back to the breaker in the main panel.
- Repeat for all selected circuits. For 240V circuits, you'll be dealing with two hot wires and a double-pole breaker.
- Connect Generator Power Input: The main input wires from your power inlet box will connect to the designated "GENERATOR INPUT" terminals in the transfer switch.
Step 4: Installing the Power Inlet Box
- Exterior Location: Choose a safe, accessible, and code-compliant exterior wall location.
- Mounting: Securely mount the weatherproof power inlet box to the exterior wall, ensuring it's sealed to prevent moisture intrusion.
- Run Cable to Transfer Switch: Run appropriately sized armored cable or conduit from the inlet box through the exterior wall to the transfer switch location inside. This run must be protected according to code (e.g., conduit, buried cable).
- Wire Connections:
- Connect the ground wire from the cable to the ground screw in the inlet box.
- Connect the neutral wire to the neutral terminal.
- Connect the two hot wires (L1 and L2) to their respective terminals in the inlet box.
- Ensure all connections are tight and secure.
- Seal Penetrations: Use appropriate sealant (silicone caulk) around the cable entry point where it passes through the wall to prevent water and pest intrusion.
Step 5: Final Checks & Professional Verification
- Visual Inspection: Double-check all wiring connections for tightness and correct polarity. Ensure no bare wires are exposed where they shouldn't be.
- Panel Covers: Replace the cover on your main electrical panel and the transfer switch enclosure.
- Restore Power (Cautiously): Once confident, turn the main breaker back on.
- Test:
- Without Generator: Test each selected circuit in "LINE" mode to ensure it functions normally on utility power.
- With Generator: This is the ultimate test. Follow the operating procedures below to connect and run your generator, then switch each selected circuit to "GEN" mode to confirm it's receiving power from the generator. This might be a good time to review how you're wiring a generator to your house in its entirety.
Crucially, if a professional electrician did the installation, they will handle these tests and verify compliance. If you DIY, consider having a licensed electrician inspect your work. An independent inspection provides peace of mind and identifies potential hazards you might have missed.
Living with Generator Power: Operating Your System
Once your system is installed and tested, using it during an outage is straightforward. Practice these steps before an actual emergency.
Before an Outage Strikes
- Generator Readiness: Keep your portable generator in good working order. Perform routine maintenance (oil changes, spark plug checks) as per the manufacturer's instructions. Ensure you have fresh, stabilized fuel on hand. You can find more specific guidance on essential generator maintenance tips to keep your unit reliable.
- Transfer Switch Familiarity: Know how to operate your transfer switch. Understand which circuits it controls.
- Generator Cord: Keep your heavy-duty generator power cord accessible and coiled, ready for use.
During an Outage
- Place Generator Safely: Move your generator to a safe, outdoor location. Remember the 5-foot rule from all openings and combustible materials.
- Connect Generator Cord: Plug one end of the generator power cord into the generator's outlet and the other end into your home's exterior power inlet box.
- Start Generator: Start your portable generator according to its manufacturer's instructions. Allow it to run for a few minutes to stabilize before applying a load.
- Engage Transfer Switch:
- Go to your manual transfer switch.
- For each circuit you want to power, flip its toggle switch from the "LINE" (utility power) position to the "GEN" (generator power) position.
- Important: Do not overload your generator. Turn on circuits one by one, especially those with high starting watts (like refrigerators or well pumps).
- Monitor: Keep an eye on your generator's fuel level and avoid continuously running it at maximum load.
Returning to Utility Power
- Flip Transfer Switch to "LINE": When utility power is restored, go to your transfer switch and flip all active circuits back to the "LINE" position. This allows them to draw power from the utility grid again.
- Turn Off Generator: Allow your generator to run for a few minutes with no load (all circuits switched to "LINE") to cool down. Then, turn it off.
- Disconnect & Store: Disconnect the generator power cord from both the generator and the inlet box. Store the cord and generator in a safe, dry place, allowing the generator to fully cool before covering it.
Keeping it Running Smoothly: Maintenance & Troubleshooting
A well-maintained system is a reliable system. Regular checks ensure your generator and transfer switch are ready when you need them most.
Manual Transfer Switch Maintenance
- Keep it Clean: Ensure the area around the transfer switch is clean and accessible. Avoid storing items in front of it.
- Test Annually: During a planned exercise, test the operation of your transfer switch at least once a year. Run your generator and cycle through the circuits to ensure they transfer correctly.
- Visual Inspection: Annually, with the power off, visually inspect all connections for any signs of corrosion, looseness, or damage. Tighten any loose connections. If you're unsure, call an electrician.
Portable Generator Maintenance
This is critical for reliable performance during an outage.
- Oil & Filters: Change the engine oil and air filter according to the manufacturer's schedule. Use the recommended oil type.
- Spark Plug: Inspect and replace the spark plug as needed. A fresh spark plug can make a big difference in starting reliability.
- Fuel System:
- Fuel Stabilizer: Always use a fuel stabilizer if you store gasoline for more than a month.
- Run Dry or Drain: If storing the generator for an extended period (e.g., off-season), either run the carburetor dry or drain the fuel tank and carburetor bowl to prevent gumming.
- Monthly Run: Start and run your generator for 15-20 minutes monthly. This lubricates internal components, keeps the carburetor clear, and charges the battery (if it has an electric start).
- Spare Parts: Keep essential spare parts on hand: spark plugs, oil, air filters, and a supply of fresh, stabilized fuel.
Seasonal Checks
Before peak storm seasons (e.g., winter for ice storms, summer for hurricanes), perform a comprehensive readiness check:
- Fuel: Ensure you have enough fresh fuel.
- Oil Level: Check the engine oil level.
- Tires: If your generator has wheels, check tire pressure.
- Test Run: Start and run the generator, simulating an outage test.
Common Issues & Troubleshooting
- Generator Won't Start: Check fuel level, spark plug, oil level (some have low-oil shutdown), carburetor (if it's been sitting), and ensure the choke is correctly set.
- Generator Starts but No Power to House:
- Check the generator's circuit breakers.
- Ensure the generator cord is fully seated at both ends.
- Verify the transfer switch toggles are firmly in the "GEN" position.
- Check individual circuit breakers in your main panel (if they tripped).
- Circuits Not Transferring: Ensure the transfer switch is fully engaged. If some circuits work but others don't, check the wiring for the non-working circuits within the transfer switch. (Again, this usually requires an electrician).
When in doubt, consult your generator's owner's manual for specific troubleshooting steps or contact a qualified technician.
Common Questions, Clear Answers
Is it legal to DIY install a transfer switch?
This varies significantly by jurisdiction. In many areas, all electrical work that connects to the main panel requires a permit and must be performed by a licensed electrician or inspected by one. Always check with your local building department first.
How far away should the generator be from the inlet box?
The generator should be far enough to prevent carbon monoxide fumes from entering the home, typically at least 5 feet from any openings (windows, doors, vents) and the house itself. The length of your generator cord will dictate how far you can place it while maintaining a safe distance.
Can I power my entire house with a portable generator?
A portable generator, even a large one, is typically not designed to power an entire house, especially simultaneous high-demand appliances like central air conditioning, electric ovens, or electric water heaters. A manual transfer switch allows you to power selected essential circuits, not necessarily every single circuit in your home.
Do I need a grounding rod for my portable generator?
Most portable generators require proper grounding to prevent electrical shock. This typically involves connecting the generator's frame to an approved grounding rod using a heavy-gauge copper wire. Always follow your generator manufacturer's instructions for grounding.
What size generator cord do I need?
The cord size (gauge) depends on the generator's amperage and the length of the cord. A 30-amp generator will typically use a 10-gauge cord, while a 50-amp generator might use 6-gauge. Longer cords require heavier gauges to prevent voltage drop and overheating. Always use a cord rated for outdoor use and the generator's output.
Taking the Next Step: Your Power-Ready Home
Installing a portable generator inlet box and manual transfer switch is a significant upgrade to your home's emergency preparedness. It moves you from a state of inconvenience and potential danger to one of safety, control, and peace of mind during power outages.
While the DIY path is tempting for the skilled homeowner, remember the fundamental dangers of electricity. Whether you decide to tackle this project yourself (with appropriate permits and knowledge) or wisely enlist the help of a licensed professional, understanding the components, the process, and the critical safety precautions is your most powerful tool.
Invest in a reliable setup, learn how to use it safely, and maintain it diligently. The next time the storm rolls in, you won't just be hoping the power comes back on—you'll be ready to bring your home back to life with a flip of a switch.