Power outages are more than just an inconvenience; they can disrupt daily life, impact essential services, and even pose risks if not managed properly. While a portable generator offers a vital lifeline during these times, connecting it to your home's electrical system isn't as simple as plugging it into a wall. It requires careful planning, adherence to strict safety protocols, and often, professional expertise. The goal is not just to get power back on, but to do so safely, legally, and without endangering yourself, your family, or utility workers.
This comprehensive guide will walk you through everything you need to know about safely wiring a generator to your house for backup power. We'll demystify the process, highlight critical safety considerations, and point you to in-depth resources for every step of your journey to reliable home backup power.
Why Safe Generator Wiring Matters: Beyond Just Power
Connecting a generator incorrectly can lead to severe consequences, far beyond just a tripped breaker. The most dangerous risks include:
- Carbon Monoxide (CO) Poisoning: Generators produce deadly carbon monoxide, an odorless, colorless gas. Running a generator indoors, in an attached garage, or too close to windows and doors can quickly lead to lethal CO poisoning.
- Backfeeding: This occurs when a generator is directly plugged into a wall outlet, sending electricity back through the utility lines. Backfeeding can electrocute utility workers attempting to restore power and damage your home's electrical system. It's illegal and incredibly dangerous.
- Electrical Fires and Damage: Improper wiring can cause short circuits, overloads, and electrical fires, damaging your home and putting lives at risk.
Understanding these risks is the first step toward ensuring a safe setup. Your peace of mind and the safety of others depend on it.
Your First Steps: Planning for Power Independence
Before you even think about wires and switches, a solid plan is essential. This involves understanding your power needs and navigating local regulations.
Sizing Your Needs: What Will You Power?
Not all generators are created equal, and not every appliance needs to run during an outage. Start by listing the essential items you can't live without: lights, a refrigerator, perhaps a well pump, or critical medical equipment. Next to each item, note its wattage. For example, a typical microwave uses 1500 watts, a circuit of CFL lights about 150 watts, and a refrigerator might surge to 1200-1500 watts when its compressor starts.
Remember, large appliances like central air conditioners, electric stoves, and tumble dryers usually draw too much power for a typical portable generator. A good portable generator, like a 3500W petrol-driven model, can comfortably handle essentials for an extended period, often around 12 hours on a single tank. To make an informed decision on what size and type of generator is right for your home, dive deeper into our guide on Choosing the Right Generator for your specific backup needs.
Navigating Local Regulations and Permits
This step cannot be stressed enough: always consult local authorities. Electrical codes, permitting requirements, and legal wiring systems vary significantly by location. Contact your local Department of Labor and Industries, Planning Department, or Power Company to understand what's required in your area. Professional installation and inspection are often mandatory for safety, code compliance, insurance coverage, and preventing fines or injury. This ensures your setup is not only safe but also fully compliant with all legal standards, including those necessary to Achieve Generator Grounding Compliance and prevent hazardous conditions.
Connecting Your Generator: Understanding Your Options
There are primarily two safe and legal methods to connect a portable generator to your house, both of which prevent dangerous backfeeding.
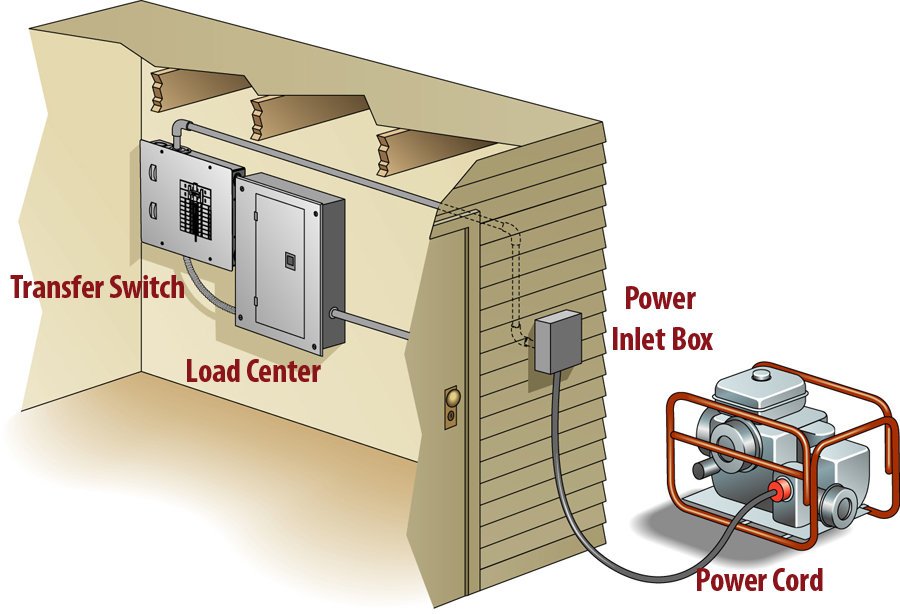
The Gold Standard: Manual Transfer Switches
A manual transfer switch is a dedicated device installed between your electrical panel and an outdoor power inlet box. It allows you to safely switch your home's selected circuits from utility power to generator power, ensuring a clear separation between the two sources. This system typically requires professional installation and is generally more expensive upfront, but it's widely considered the safest and often the only legally guaranteed option.
With a transfer switch, specific circuits are preselected, making operation simpler with fewer monitoring needs and a lower risk of overloading the generator. For a complete breakdown of how these crucial devices work and which option might be best for your home, explore our guide on Understanding Generator Transfer Switches and how they ensure a secure power transition.
Mechanical Interlocks: A Closer Look
A mechanical interlock kit fits directly within your existing electrical panel, preventing both the main utility breaker and the generator breaker from being "on" at the same time. While it's generally a cheaper and simpler alternative to a full transfer switch, it comes with important caveats:
- Legality and Safety: Mechanical interlocks can be illegal in many areas and potentially unsafe if not installed with utmost care and strict adherence to specific brand and model compatibility. A kit must be approved for your specific breaker box (made by the same company).
- Manual Monitoring: This method provides flexibility to power any circuit, but it requires diligent manual monitoring to prevent overloading the generator. You'll need to know your generator's capacity and manage the load yourself.
Always verify local regulations and consider the inherent safety differences before opting for a mechanical interlock.
Professional vs. DIY: Making the Right Installation Choice
When it comes to wiring a generator to your home, the choice between professional and DIY installation is critical.
The Professional Advantage
Hiring a licensed electrician for your generator installation offers unparalleled peace of mind. Professionals understand the complex electrical codes, ensure proper grounding and bonding, and can correctly size and install the necessary components like the power inlet box and transfer switch. Their expertise guarantees safety, compliance, and proper functionality. If you're serious about a robust and code-compliant setup, you'll want to Learn professional generator installation and wiring insights that extend beyond basic connections.
When DIY is an Option (With Caution)
While we strongly advocate for professional installation for the entire system, some homeowners might consider a DIY approach for specific components, such as installing a recessed male connector inlet box. This exterior-mounted box, typically placed close to the electrical panel, is where your generator's power cord plugs into your home's system. Bottom-mount inlets often offer better weather protection.
However, even for components like the inlet box, professional consultation and final inspection are non-negotiable. Any wiring to your home's electrical panel must be done by a qualified electrician to ensure safety and code compliance. For those considering taking on specific, smaller aspects of the physical installation, our DIY Generator Installation Guide provides detailed steps, but it's paramount to understand that all electrical connections to your home's main panel or transfer switch require professional handling.
Step-by-Step: From Inlet to Operation (Simplified Overview)
Once your system is professionally installed, operating your generator safely involves a clear sequence of steps.
Generator Placement and Safety Essentials
Your generator's placement is paramount for safety.
- Distance: Always place the generator at least 10 feet (3 meters) away from your home, on a level, stable surface.
- Exhaust Direction: Point the exhaust away from all windows, doors, and vents to prevent deadly carbon monoxide from entering your home.
- CO Detectors: Always use battery-operated carbon monoxide detectors inside your house when operating a generator, and check their batteries regularly.
- Never Indoors: Absolutely never run a generator inside your home, an attached garage, shed, or close to any open windows.
The Basic Wiring Flow (Professional's View)
A professionally installed system ensures a seamless and safe connection:
- Power Inlet Box: A recessed male connector inlet box is installed on your home's exterior, ready to receive power from your generator.
- Transfer Switch/Interlock: This critical device is mounted near your electrical panel.
- Circuit Connections: An electrician runs flexible conduit from the transfer switch to your main electrical panel, connecting the selected circuits. Another conduit connects the power inlet box to the transfer switch.
- Utility Disconnect: Before any internal wiring, the local utility company must disconnect your power and often remove your meter.
- Professional Inspection: Once installed, your entire setup is professionally inspected to confirm safety and code compliance.
Operating Your Generator Safely and Effectively
With your system installed and inspected, here's how to safely operate your generator during an outage:
- Prepare the Generator: Move the generator to its designated outdoor spot (10 feet from the house, exhaust away). Check the engine's oil level and add if needed. Consult your user manual for specific instructions, especially for cold weather starting (e.g., glow plugs if available).
- Connect the Power Cord: Ensure all appliances are unplugged and turned off before operating the generator. Plug the generator's attachment cable into the exterior inlet box, matching the holes and prongs, and twist to secure.
- Start the Generator: Following the manufacturer's instructions, start the generator engine (usually with a switch or key). Allow it to run for about 5 minutes to warm up.
- Switch Power Source: Go to your main electrical panel or transfer switch. First, flip off the utility main breaker. Then, turn on the generator main breaker on your transfer switch or move the interlock plate to engage the generator breaker.
- Activate Loads Gradually: Flip the breakers on your installed transfer switch or specific circuits on your panel one by one, slowly turning on the desired loads. If using a mechanical interlock, monitor the load closely, starting with essentials and adding others gradually to prevent overloading. Be familiar with your generator’s load capacity and emergency shutdown steps.
- Return to Utility Power: When utility power is restored, reverse the process:
- Flip all individual circuit breakers that were powered by the generator to the "OFF" position.
- Turn your generator's main breaker (on the transfer switch/interlock) to the "OFF" position.
- Turn your generator off by flipping its switch or key into the "OFF" position.
- Once the generator is off, flip the utility main breaker back to the "ON" position.
- Finally, turn on your individual household circuit breakers one by one.
Always ensure any appliances your generator was powering are turned off and unplugged before shutting down the generator.
Keeping Your Generator Ready: Maintenance Tips
A generator is an investment that needs consistent care to perform when you need it most.
- Regular Servicing: Perform oil changes and check/replace air filters as recommended by the manufacturer.
- Monthly Testing: Test your generator monthly to ensure it starts and runs properly under a light load for 15-30 minutes.
- Connection Checks: Double-check all connections between the generator, power inlet box, and transfer switch for wear or looseness.
- Spark Plugs: Inspect and clean spark plugs, replacing them as needed.
- Spare Parts: Keep essential spare parts on hand, such as oil filters, spark plugs, and fuel stabilizer.
Preparing for power outages means more than just having a generator; it means having a safely and professionally installed system that you understand how to operate. By following these guidelines and utilizing the resources we've provided, you can ensure reliable backup power for your home, protecting your family and your property. Don't wait for the lights to go out – plan, prepare, and secure your power independence today.